9
08
2018
UPnP/OpenHome Music Server の自作(その9)
KVM仮想環境上で “upmpdcli” を動かしてみる
前回は、CnetOS7上で苦労して”upmpdcli” 動作環境を構築したが、今回はバイナリパッケージが最初から用意されている Debian Stretch(Version 9)を用いて”upmpdcli”を動作させてみることにする.
CentOS7はRed Hat Enterprise Linux系列のOSであり、どちらかというとエンタープライズ分野でのメインサーバ環境として提供されているのもであるので、KVMという仮想サーバ環境を運用する機能が備わっている.仮想サーバ環境で仮想マシンを運用する事はITエンジニアにとっては極々当たり前の事なのだが、一般の人達にとっては仮想サーバと言われても中々イメージが掴めないかも知れない.VMWare WorkstationやVMWare FusionなどのPCやMacintosh上で動作する仮想環境であれば、利用している人は多いので、何となく仮想マシンのイメージが掴めるかもしれない.
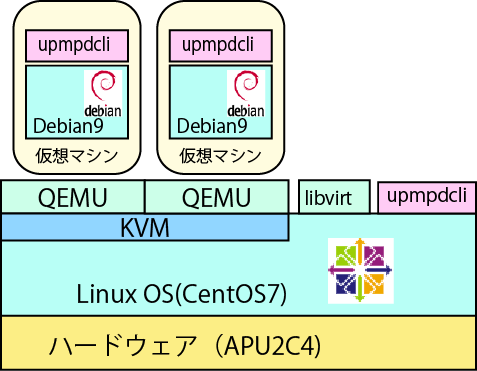
KVM環境上でDebian OSを動かし、”upmpdcli” アプリを稼働させるときのイメージ

iPad上の”fidata”アプリから複数の出力先を選択している様子
今回構築するKVM(Kernel-based Virtual Machine)仮想マシンは、オープンソースの仮想環境実装フレームワークで、エンタープライズ系のITの世界ではVMWare ESXiと並んで広く普及している.さくらインターネットやConoHaなどのVPS系のサービスは、殆どがこのKVM環境上に構築された仮想サーバ(VPS)で提供されており、安定性も高くとても実績のある仮想化技術である.
今回は仮想環境についての話では無く、”upmpdcli” をKVM仮想環境上に構築することが目的なので、実装の手順だけの紹介に留めることにする.KVM仮想環境を使いこなすにはそれなりのLinuxスキルが必要になるので、Linuxに不慣れな人は手を出さない方が良いだろう.
KVM環境をホストOS(CentOS7)側へインストールする
今回構築している、CentOS7サーバは、ベースが基本最小構成 “Minimal” で構築しているので、KVM仮想環境を実装するためのライブラリや関連モジュールが全く組み込まれていないので、先ずはKVM仮想環境から整える必要がある.
KVM環境のインストールは yum コマンドを用いてインストールを行う.今回は既に dnf コマンド環境を構築済みであるので、dnfコマンドの例を示してあるが、”dnf” の部分を単純に “yum” に置き換えれば良い.
dnf install bridge-utils
dnf install qemu-kvm
dnf install virt-manager
dnf install libvirt
dnf install libvirt-client
dnf install virt-install
dnf install libguestfs
dnf install virt-top
dnf install virt-who
dnf install virt-viewer

systemctl start libvirtd
systemctl enable libvirtd

[root@jukebox ~]# systemctl status libvirtd
● libvirtd.service - Virtualization daemon
   Loaded: loaded (/usr/lib/systemd/system/libvirtd.service; enabled; vendor preset: enabled)
   Active: active (running) since Mon 2018-09-03 21:22:45 JST; 4 days ago
     Docs: man:libvirtd(8)
           https://libvirt.org
 Main PID: 1228 (libvirtd)
   CGroup: /system.slice/libvirtd.service
           └─1228 /usr/sbin/libvirtd
ホストOS(CentOS7)側のネットワーク設定
KVM仮想環境を用いてゲストOSのDebianを動かす場合、ゲストOS側のネットワークがホストOS側のネットワーク環境を通じて外部とアクセスすることになる.これを実現する方法は幾つかあるが、今回は一番単純なブリッジ接続による方法を紹介する.
ブリッジ接続はホストOS側にブリッジという、L2レベルで直接通信が行える機能を持ったインタフェースデバイスを作成し、それを介してゲストOS側のネットワークインタフェースがつながるようにする.
ブリッジはL2スイッチとは異なり、全てのパケットをブリッジ配下のネットワーク機器に垂れ流す役目を担っていると考えれば良いだろう.ブリッジインタフェースの機能は昔のダムハブ(所謂リピータハブ)を思い起こせば良いだろう.
APU2C4の3つの物理NICを3つのブリッジにそれぞれ割り当てる.割り当てられたブリッジを介して、ホストOS側のCentOS7とゲストOS側のDebian Stretchが同じ3つのネットワークセグメントを共有することになる.
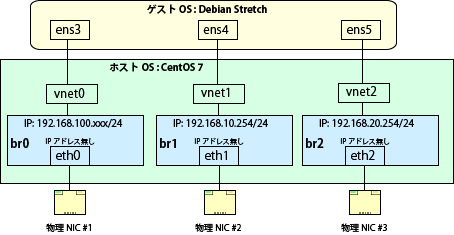
ブリッジ方式によるゲストOSをホストOS側への接続イメージ
既存インタフェース設定ファイルのバックアップ
先ずは、既存のホストOS側のインタフェース設定ファイル “/etc/sysconfig/network-scripts/ifcfg-eth0″, eth1, eth2” のバックアップを取っておく.同一フォルダ内に、ifcfg-eth0.bak などの名前で保存して置けば良いだろう.設定作業を失敗した場合の切り戻しの際の保険だと思って欲しい.
[root@jukebox ~]# cd /etc/sysconfig/network-scripts
[root@jukebox network-scripts]# cat ifcfg-eth0
TYPE=Ethernet
PROXY_METHOD=none
BROWSER_ONLY=no
BOOTPROTO=dhcp
DEFROUTE=yes
IPV4_FAILURE_FATAL=no
IPV6INIT=yes
IPV6_AUTOCONF=yes
IPV6_DEFROUTE=yes
IPV6_FAILURE_FATAL=no
IPV6_ADDR_GEN_MODE=stable-privacy
NAME=eth0
UUID=693332f0-4b5b-457c-bd2f-3ae70ac26d82
DEVICE=eth0
ONBOOT=yes
PREFIX=24
ZONE=lan_trusted
IPADDR=192.168.100.51
[root@jukebox network-scripts]# cat ifcfg-eth1
TYPE=Ethernet
PROXY_METHOD=none
BROWSER_ONLY=no
BOOTPROTO=none
DEFROUTE=yes
IPV4_FAILURE_FATAL=no
IPV6INIT=no
IPV6_AUTOCONF=no
IPV6_DEFROUTE=no
IPV6_FAILURE_FATAL=no
IPV6_ADDR_GEN_MODE=stable-privacy
NAME=eth1
UUID=8ce21700-d530-4727-86f2-36a128ea01eb
DEVICE=eth1
ONBOOT=yes
IPADDR=192.168.10.254
PREFIX=24
ZONE=nat_trusted
[root@jukebox network-scripts]# cat ifcfg-eth2
TYPE=Ethernet
PROXY_METHOD=none
BROWSER_ONLY=no
BOOTPROTO=none
DEFROUTE=yes
IPV4_FAILURE_FATAL=no
IPV6INIT=no
IPV6_AUTOCONF=no
IPV6_DEFROUTE=no
IPV6_FAILURE_FATAL=no
IPV6_ADDR_GEN_MODE=stable-privacy
NAME=eth2
UUID=af3dfa78-9cf5-4d7e-8209-5e8ebda01000
DEVICE=eth2
ONBOOT=yes
IPADDR=192.168.20.254
PREFIX=24
ZONE=napt_trusted

[root@jukebox network-scripts]# cp ifcfg-eth0 ifcfg-eth0.bak
[root@jukebox network-scripts]# cp ifcfg-eth1 ifcfg-eth1.bak
[root@jukebox network-scripts]# cp ifcfg-eth2 ifcfg-eth2.bak
ブリッジインタフェースの作成
新規にブリッジインタフェースを作成する.この際に、インタフェース”eth0″, “eth1”, “eth2” に対して行った設定と同じにしておく.
[root@jukebox ~]# nmcli connection add type bridge autoconnect yes con-name br0 ifname br0
Connection 'br0' (104ee704-e5c4-422b-9996-b9530fc745bd) successfully added.
[root@jukebox ~]# nmcli connection add type bridge autoconnect yes con-name br1 ifname br1
Connection 'br1' (23011eb4-f267-4249-886d-ccbd1bc2aba0) successfully added.
[root@jukebox ~]# nmcli connection add type bridge autoconnect yes con-name br2 ifname br2
Connection 'br2' (8e480f0b-f889-40ec-ab1d-e3b35fb2a901) successfully added.
[root@jukebox ~]#
[root@jukebox ~]# nmcli connection modify br0 ipv4.method  auto
[root@jukebox network-scripts]# nmcli connection modify br1 ipv4.method  manual
[root@jukebox network-scripts]# nmcli connection modify br2 ipv4.method  manual

[root@jukebox network-scripts]# nmcli connection modify br1 ipv4.addresses 192.168.10.254/24
[root@jukebox network-scripts]# nmcli connection modify br2 ipv4.addresses 192.168.20.254/24

[root@jukebox network-scripts]# cat ifcfg-br0
STP=yes
BRIDGING_OPTS=priority=32768
TYPE=Bridge
PROXY_METHOD=none
BROWSER_ONLY=no
BOOTPROTO=dhcp
DEFROUTE=yes
IPV4_FAILURE_FATAL=no
IPV6INIT=yes
IPV6_AUTOCONF=yes
IPV6_DEFROUTE=yes
IPV6_FAILURE_FATAL=no
UUID=104ee704-e5c4-422b-9996-b9530fc745bd
DEVICE=br0
ONBOOT=yes

[root@jukebox network-scripts]# cat ifcfg-br1
STP=yes
BRIDGING_OPTS=priority=32768
TYPE=Bridge
PROXY_METHOD=none
BROWSER_ONLY=no
BOOTPROTO=none
DEFROUTE=yes
IPV4_FAILURE_FATAL=no
IPV6INIT=yes
IPV6_AUTOCONF=yes
IPV6_DEFROUTE=yes
IPV6_FAILURE_FATAL=no
IPV6_ADDR_GEN_MODE=stable-privacy
NAME=br1
UUID=23011eb4-f267-4249-886d-ccbd1bc2aba0
DEVICE=br1
ONBOOT=yes
IPADDR=192.168.10.254
PREFIX=24

[root@jukebox network-scripts]# cat ifcfg-br2
STP=yes
BRIDGING_OPTS=priority=32768
TYPE=Bridge
PROXY_METHOD=none
BROWSER_ONLY=no
BOOTPROTO=none
DEFROUTE=yes
IPV4_FAILURE_FATAL=no
IPV6INIT=yes
IPV6_AUTOCONF=yes
IPV6_DEFROUTE=yes
IPV6_FAILURE_FATAL=no
IPV6_ADDR_GEN_MODE=stable-privacy
NAME=br2
UUID=8e480f0b-f889-40ec-ab1d-e3b35fb2a901
DEVICE=br2
ONBOOT=yes
IPADDR=192.168.20.254
PREFIX=24

[root@jukebox network-scripts]#
既存インタフェース “eth0”, “eth1”, “eth2″の削除
既存のインタフェース”eth0″, “eth1”, “eth2” を一旦削除した後、新しく作成したブリッジインタフェース “br0”, “br1”, “br2” と結びつける.
[root@jukebox network-scripts]# nmcli connection delete eth0
Connection 'eth0' (693332f0-4b5b-457c-bd2f-3ae70ac26d82) successfully deleted.
[root@jukebox network-scripts]# nmcli connection delete eth1
Connection 'eth1' (8ce21700-d530-4727-86f2-36a128ea01eb) successfully deleted.
[root@jukebox network-scripts]# nmcli connection delete eth2
Connection 'eth2' (af3dfa78-9cf5-4d7e-8209-5e8ebda01000) successfully deleted.
[root@jukebox network-scripts]#
[root@jukebox network-scripts]# nmcli connection add type bridge-slave autoconnect yes con-name eth0 ifname eth0 master br0
Connection 'eth0' (8806ccaa-4a11-4c50-8c6a-bcdd6d4c3ba7) successfully added.
[root@jukebox network-scripts]# nmcli connection add type bridge-slave autoconnect yes con-name eth1 ifname eth1 master br1
Connection 'eth1' (6cc89fd7-c5b4-44ca-a839-7a75ef9ddaaf) successfully added.
[root@jukebox network-scripts]# nmcli connection add type bridge-slave autoconnect yes con-name eth2 ifname eth2 master br2
Connection 'eth2' (fd27864b-9c66-4da7-825a-baf8b3c59934) successfully added.
[root@jukebox network-scripts]#
セキュリティーゾーンと追加(別名)IPアドレスの設定
セキュリティーゾーンをブリッジインタフェースと新しく設定したホストOS側の仮想インタフェースに対して設定する.
[root@jukebox network-scripts]# cat ifcfg-br0
STP=yes
BRIDGING_OPTS=priority=32768
TYPE=Bridge
PROXY_METHOD=none
BROWSER_ONLY=no
BOOTPROTO=dhcp
DEFROUTE=yes
IPV4_FAILURE_FATAL=no
IPV6INIT=yes
IPV6_AUTOCONF=yes
IPV6_DEFROUTE=yes
IPV6_FAILURE_FATAL=no
DEVICE=eth0
ONBOOT=yes
BRIDGE=br0
ZONE=lan_trusted
IPADDR=192.168.100.51

[root@jukebox network-scripts]# cat ifcfg-br1
STP=yes
BRIDGING_OPTS=priority=32768
TYPE=Bridge
PROXY_METHOD=none
BROWSER_ONLY=no
BOOTPROTO=none
DEFROUTE=yes
IPV4_FAILURE_FATAL=no
IPV6INIT=yes
IPV6_AUTOCONF=yes
IPV6_DEFROUTE=yes
IPV6_FAILURE_FATAL=no
IPV6_ADDR_GEN_MODE=stable-privacy
NAME=br1
UUID=23011eb4-f267-4249-886d-ccbd1bc2aba0
DEVICE=br1
ONBOOT=yes
IPADDR=192.168.10.254
PREFIX=24
ZONE=nat_trusted

[root@jukebox network-scripts]# cat ifcfg-br2
STP=yes
BRIDGING_OPTS=priority=32768
TYPE=Bridge
PROXY_METHOD=none
BROWSER_ONLY=no
BOOTPROTO=none
DEFROUTE=yes
IPV4_FAILURE_FATAL=no
IPV6INIT=yes
IPV6_AUTOCONF=yes
IPV6_DEFROUTE=yes
IPV6_FAILURE_FATAL=no
IPV6_ADDR_GEN_MODE=stable-privacy
NAME=br2
UUID=8e480f0b-f889-40ec-ab1d-e3b35fb2a901
DEVICE=br2
ONBOOT=yes
IPADDR=192.168.20.254
PREFIX=24
ZONE=napt_trusted

[root@jukebox network-scripts]# cat ifcfg-eth0
TYPE=Ethernet
NAME=eth0
UUID=8806ccaa-4a11-4c50-8c6a-bcdd6d4c3ba7
DEVICE=eth0
ONBOOT=yes
BRIDGE=br0
ZONE=lan_trusted
IPADDR=192.168.100.51

[root@jukebox network-scripts]# cat ifcfg-eth1
TYPE=Ethernet
NAME=eth1
UUID=6cc89fd7-c5b4-44ca-a839-7a75ef9ddaaf
DEVICE=eth1
ONBOOT=yes
BRIDGE=br1
ZONE=nat_trusted

[root@jukebox network-scripts]# cat ifcfg-eth2
TYPE=Ethernet
NAME=eth2
UUID=fd27864b-9c66-4da7-825a-baf8b3c59934
DEVICE=eth2
ONBOOT=yes
BRIDGE=br2
ZONE=napt_trusted
インタフェース設定とセキュリティーゾーンの確認
ネットワークを再起動したら、インタフェースの設定情報とセキュリティーゾーンが正しく設定されているか確認しておく.
[root@jukebox ~]# ip a
1: lo:  mtu 65536 qdisc noqueue state UNKNOWN group default qlen 1000
    link/loopback 00:00:00:00:00:00 brd 00:00:00:00:00:00
    inet 127.0.0.1/8 scope host lo
       valid_lft forever preferred_lft forever
2: eth0:  mtu 1500 qdisc mq master br0 state UP group default qlen 1000
    link/ether 00:0d:b9:47:1c:18 brd ff:ff:ff:ff:ff:ff
3: eth1:  mtu 1500 qdisc mq master br1 state UP group default qlen 1000
    link/ether 00:0d:b9:47:1c:19 brd ff:ff:ff:ff:ff:ff
4: eth2:  mtu 1500 qdisc mq master br2 state DOWN group default qlen 1000
    link/ether 00:0d:b9:47:1c:1a brd ff:ff:ff:ff:ff:ff
5: br2:  mtu 1500 qdisc noqueue state DOWN group default qlen 1000
    link/ether 00:0d:b9:47:1c:1a brd ff:ff:ff:ff:ff:ff
    inet 192.168.20.254/24 brd 192.168.20.255 scope global noprefixroute br2
       valid_lft forever preferred_lft forever
6: br1:  mtu 1500 qdisc noqueue state UP group default qlen 1000
    link/ether 00:0d:b9:47:1c:19 brd ff:ff:ff:ff:ff:ff
    inet 192.168.10.254/24 brd 192.168.10.255 scope global noprefixroute br1
       valid_lft forever preferred_lft forever
7: br0:  mtu 1500 qdisc noqueue state UP group default qlen 1000
    link/ether 00:0d:b9:47:1c:18 brd ff:ff:ff:ff:ff:ff
    inet 192.168.100.14/24 brd 192.168.100.255 scope global noprefixroute br0
       valid_lft forever preferred_lft forever
    inet 192.168.100.51/24 brd 192.168.100.255 scope global secondary noprefixroute br0
       valid_lft forever preferred_lft forever
[root@jukebox ~]#

[root@jukebox ~]#  firewall-cmd --get-active-zone
nat_trusted
  interfaces: br1 eth1
napt_trusted
  interfaces: br2 eth2
lan_trusted
  interfaces: br0 eth0
[root@jukebox ~]#
[root@jukebox ~]#  firewall-cmd  --list-all --zone=lan_trusted
lan_trusted (active)
  target: ACCEPT
  icmp-block-inversion: no
  interfaces: br0 eth0
  sources:
  services:
  ports:
  protocols:
  masquerade: yes
  forward-ports: port=6600:proto=tcp:toport=6600:toaddr=192.168.10.51
  source-ports:
  icmp-blocks:
  rich rules:

[root@jukebox ~]# firewall-cmd  --list-all --zone=napt_trusted
napt_trusted (active)
  target: ACCEPT
  icmp-block-inversion: no
  interfaces: br2 eth2
  sources:
  services:
  ports:
  protocols:
  masquerade: yes
  forward-ports:
  source-ports:
  icmp-blocks:
  rich rules:

[root@jukebox ~]# firewall-cmd  --list-all --zone=nat_trusted
nat_trusted (active)
  target: ACCEPT
  icmp-block-inversion: no
  interfaces: br1 eth1
  sources:
  services:
  ports:
  protocols:
  masquerade: no
  forward-ports:
  source-ports:
  icmp-blocks:
  rich rules:

[root@jukebox ~]#
ゲストOS(Debian Stretch)のインストール
KVM仮想環境下でゲストOSのDebian Stretchを新規にインストールするために、今回は”virt-install” コマンドを使って、インターネット経由でDebian Stretchイメージファイルをダウンロードし、ゲストOSイメージを作成する.
コマンドの細かなパラメータの説明は行わないが、今回は3つのブリッジインタフェースにつながる仮想ネットワークインタフェースを3つ作成するので、 “–network” パラメータを3つ追加する.(注:”upmpdcli” は実際には1つのNWインタフェースしか使わないので、今回の用途では br0 1つだけで良いが、他の用途も考えてここでは3つ作成している)
APU2C4はメモリを4GB搭載しているので、512MB程度の仮想サーバを1つ立ち上げることは問題ない筈だ.本来であればゲストOSを安定稼働させるために必要となるコンピューティングリソースをきちんと把握した上で、適切なリソースパラメータを設定するのが筋だが、今回は大雑把な設定で済ませている.
“dirt-install” コマンドの詳細は、RedHatのカスタマーポータルサイト「3.2. VIRT-INSTALL を使用したゲストの作成」を参照すると良いだろう.
[root@jukebox libvirt]# virt-install \
> --name debian9 \
> --ram 512 \
> --disk path=/var/lib/libvirt/images/debian9.img,size=8 \
> --vcpus 1 \
> --os-type linux \
> --os-variant debian9 \
> --network bridge=br0 \
> --network bridge=br1 \
> --network bridge=br2 \
> --graphics none \
> --console pty,target_type=serial \
> --location 'http://ftp.jaist.ac.jp/pub/Linux/debian/dists/stretch/main/installer-amd64/' \
> --extra-args 'console=ttyS0,115200n8 serial'

Starting install...
Retrieving file linux...                                                                                           | 4.0 MB  00:00:00
Retrieving file initrd.gz...                                                                                       |  24 MB  00:00:03
Allocating 'debian9.img'                                                                                           | 8.0 GB  00:00:00
Connected to domain debian9
Escape character is ^]
[    0.000000] Linux version 4.9.0-7-amd64 (debian-kernel@lists.debian.org) (gcc version 6.3.0 20170516 (Debian 6.3.0-18+deb9u1) ) #1 SMP Debian 4.9.110-1 (2018-07-05)
[    0.000000] Command line: console=ttyS0,115200n8 serial method=http://ftp.jaist.ac.jp/pub/Linux/debian/dists/stretch/main/installer-amd64/
[    0.000000] x86/fpu: Legacy x87 FPU detected.
[    0.000000] e820: BIOS-provided physical RAM map:
[    0.000000] BIOS-e820: [mem 0x0000000000000000-0x000000000009fbff] usable
[    0.000000] BIOS-e820: [mem 0x000000000009fc00-0x000000000009ffff] reserved
[    0.000000] BIOS-e820: [mem 0x00000000000f0000-0x00000000000fffff] reserved
[    0.000000] BIOS-e820: [mem 0x0000000000100000-0x000000001fff6fff] usable
[    0.000000] BIOS-e820: [mem 0x000000001fff7000-0x000000001fffffff] reserved
[    0.000000] BIOS-e820: [mem 0x00000000feffc000-0x00000000feffffff] reserved
[    0.000000] BIOS-e820: [mem 0x00000000fffc0000-0x00000000ffffffff] reserved
[    0.000000] NX (Execute Disable) protection: active
[    0.000000] SMBIOS 2.4 present.
[    0.000000] Hypervisor detected: KVM
[    0.000000] Kernel/User page tables isolation: disabled
[    0.000000] AGP: No AGP bridge found
[    0.000000] e820: last_pfn = 0x1fff7 max_arch_pfn = 0x400000000
[    0.000000] x86/PAT: Configuration [0-7]: WB  WC  UC- UC  WB  WC  UC- WT
[    0.000000] found SMP MP-table at [mem 0x000f6370-0x000f637f] mapped at [ffff9338400f6370]
[    0.000000] RAMDISK: [mem 0x1e854000-0x1ffeffff]
[    0.000000] ACPI: Early table checksum verification disabled
[    0.000000] ACPI: RSDP 0x00000000000F61D0 000014 (v00 BOCHS )
[    0.000000] ACPI: RSDT 0x000000001FFFFAD7 000030 (v01 BOCHS  BXPCRSDT 00000001 BXPC 00000001)

  ...  途中省略
今回のインストール例では、Debianイメージを日本のミラーサイトから取得しているが、ISOイメージファイルを予めダウンロードし、ホストOS上のISOイメージからゲストOSのインストーラーを起動させることも可能だ.ISOイメージを “/var/tmp/debian-9.5.0-amd64-netinst.iso” に置いた場合の “virt-install” コマンドのオプションは次の様に指定すれば良いだろう.
virt-install \
 --name debian9-test \
 --ram 512 \
 --disk path=/var/lib/libvirt/images/debian9-test.img,size=8 \
 --vcpus 1 \
 --os-type linux \
 --os-variant debian9 \
 --network bridge=br0 \
 --graphics none \
 --console pty,target_type=serial \
 --location /var/tmp/debian-9.5.0-amd64-netinst.iso \
 --extra-args  " console=ttyS0,115200n8 serial "
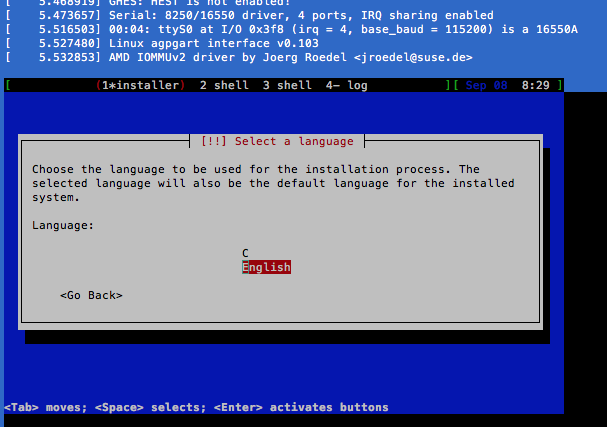
やがてDebian Stretchのテキストベースインストーラが起動する
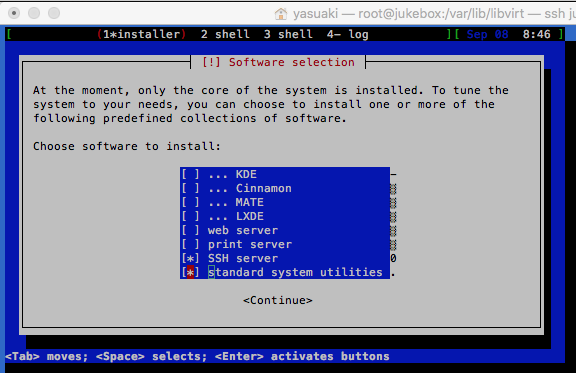
勿論GUI関係は全て省いて軽量化を図る
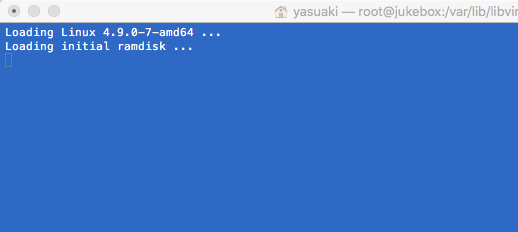
インストールが終わると自動的に再起動するが、コンソール画面は表示されなくなる
インストール作業が終了すると、自動的に再起動してDebian Stretchが起動するが、KVMのコンソール画面は “Loading initial ramdisk …” というメッセージの後で、何も表示されなくなる.これはゲストOSのDebian 9 のブートローダ(grub) のコンソール出力の設定が正しく行われていないためで、実際にはきちんと裏でDebian Stretchが正常に起動している.
この状態でホストOSや外部のPC上から、sshコマンドでログインが可能なので、普段はsshコマンドでログインさえできれば問題無いが、一番最初はDebianのIPアドレス設定がDHCPによる取得になっているので、ゲストOSのIPアドレスをコンソールから確認できないと不便だ.
ゲストOS側のコンソール画面を、ホストOS側のコンソール画面やsshなどのターミナル画面に表示させるには、最初の”GRUB”起動画面上でシリアルコンソール出力するためのパラメータを追加すれば良い.
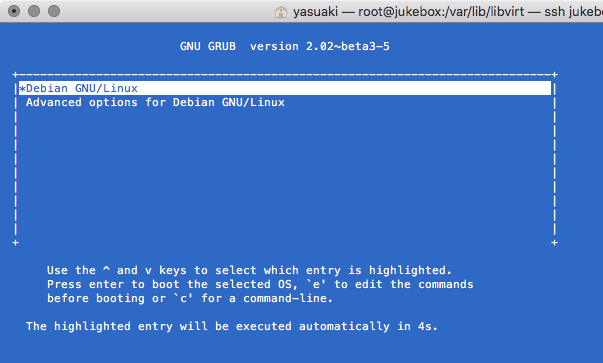
Debian起動時のGRUB設定コンソールで “e” キーを押して編集モードに入る
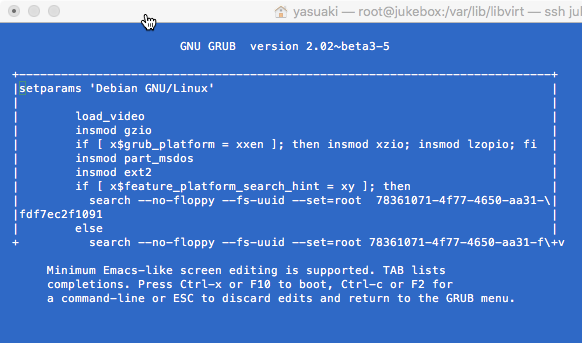
Mac OS Xの ”Terminal”アプリ上ではカーソルキーが働かないのでNGだった
Mac OS Xの”Terminal”アプリ上でゲストOSのコンソール画面を表示させようとすると、何故かカーソル制御ができず、GRUBのパラメータを編集することができなかった.時間がなくて確認できていないが、”Terminal”アプリのエミュレーションモードを”VT100″などに設定すれば、カーソルキーの制御ができるようになるかもしれない.
編集すべきGRUBのパラメータは、
linux /boot/vmlinuz-4.9.0-7-amd64 root=/dev/vda1 ro quiet
という行で、この行の末尾の “quiet” を削って、後に
linux /boot/vmlinuz-4.9.0-7-amd64 root=/dev/vda1 ro console=ttyS0
を追加する.追加したら CTRL-x か F10 を押下してブートローダに制御を渡せばよい.
これで、ホストOS側のコンソール画面上にゲストOSのコンソール画面が表示されるようになるはずである.
ちなみに、ゲストOSのコンソール画面からホストOS側のコンソール画面に切り替える(戻す)には、”CTRL-] “(コントロールキーと “]” キーを同時押下)を打てば良い.
+----------------------------------------------------------------------------+
 |        if [ x$feature_platform_search_hint = xy ]; then                    |^
 |          search --no-floppy --fs-uuid --set=root  78361071-4f77-4650-aa31-\|
 |fdf7ec2f1091                                                                |
 |        else                                                                |
 |          search --no-floppy --fs-uuid --set=root 78361071-4f77-4650-aa31-f\|
 |df7ec2f1091                                                                 |
 |        fi                                                                  |
 |        echo        'Loading Linux 4.9.0-7-amd64 ...'                       |
 |        linux        /boot/vmlinuz-4.9.0-7-amd64 root=/dev/vda1 ro  quiet   | <== この行
 |        echo        'Loading initial ramdisk ...'                           |
 |        initrd        /boot/initrd.img-4.9.0-7-amd64                        |
 |                                                                            |
 +----------------------------------------------------------------------------+

      Minimum Emacs-like screen editing is supported. TAB lists
      completions. Press Ctrl-x or F10 to boot, Ctrl-c or F2 for
      a command-line or ESC to discard edits and return to the GRUB menu.


+----------------------------------------------------------------------------+
 |        if [ x$feature_platform_search_hint = xy ]; then                    |^
 |          search --no-floppy --fs-uuid --set=root  78361071-4f77-4650-aa31-\|
 |fdf7ec2f1091                                                                |
 |        else                                                                |
 |          search --no-floppy --fs-uuid --set=root 78361071-4f77-4650-aa31-f\|
 |df7ec2f1091                                                                 |
 |        fi                                                                  |
 |        echo        'Loading Linux 4.9.0-7-amd64 ...'                       |
 |        linux        /boot/vmlinuz-4.9.0-7-amd64 root=/dev/vda1 ro console=\|
 |ttyS0                                                                       |
 |        echo        'Loading initial ramdisk ...'                           |
 |        initrd        /boot/initrd.img-4.9.0-7-amd64                        |v
 +----------------------------------------------------------------------------+

      Minimum Emacs-like screen editing is supported. TAB lists
      completions. Press Ctrl-x or F10 to boot, Ctrl-c or F2 for

Loading Linux 4.9.0-7-amd64 ...
Loading initial ramdisk ...
[    0.000000] Linux version 4.9.0-7-amd64 (debian-kernel@lists.debian.org) (gcc version 6.3.0 20170516 (Debian 6.3.0-18+deb9u1) ) #1 SMP Debian 4.9.110-3+deb9u2 (2018-08-13)
[    0.000000] Command line: BOOT_IMAGE=/boot/vmlinuz-4.9.0-7-amd64 root=/dev/vda1 ro console=ttyS0
[    0.000000] x86/fpu: Legacy x87 FPU detected.
[    0.000000] e820: BIOS-provided physical RAM map:
[    0.000000] BIOS-e820: [mem 0x0000000000000000-0x000000000009fbff] usable
[    0.000000] BIOS-e820: [mem 0x000000000009fc00-0x000000000009ffff] reserved
[    0.000000] BIOS-e820: [mem 0x00000000000f0000-0x00000000000fffff] reserved
[    0.000000] BIOS-e820: [mem 0x0000000000100000-0x000000001fff6fff] usable
[    0.000000] BIOS-e820: [mem 0x000000001fff7000-0x000000001fffffff] reserved
[    0.000000] BIOS-e820: [mem 0x00000000feffc000-0x00000000feffffff] reserved
[    0.000000] BIOS-e820: [mem 0x00000000fffc0000-0x00000000ffffffff] reserved
[    0.000000] NX (Execute Disable) protection: active
[    0.000000] SMBIOS 2.4 present.
[    0.000000] Hypervisor detected: KVM
[    0.000000] Kernel/User page tables isolation: disabled
[    0.000000] AGP: No AGP bridge found
[    0.000000] e820: last_pfn = 0x1fff7 max_arch_pfn = 0x400000000
[    0.000000] x86/PAT: Configuration [0-7]: WB  WC  UC- UC  WB  WC  UC- WT
[    0.000000] found SMP MP-table at [mem 0x000f6370-0x000f637f] mapped at [ffff8e5f400f6370]
[    0.000000] RAMDISK: [mem 0x1e885000-0x1f9cdfff]
[    0.000000] ACPI: Early table checksum verification disabled


[  OK  ] Started Serial Getty on ttyS0.
[  OK  ] Reached target Login Prompts.
[  OK  ] Started OpenBSD Secure Shell server.
[  OK  ] Reached target Multi-User System.
[  OK  ] Reached target Graphical Interface.
         Starting Update UTMP about System Runlevel Changes...
[  OK  ] Started Update UTMP about System Runlevel Changes.

Debian GNU/Linux 9 jukebox-debian9 ttyS0

jukebox-debian9 login: root
Password:
Linux jukebox-debian9 4.9.0-7-amd64 #1 SMP Debian 4.9.110-3+deb9u2 (2018-08-13) x86_64

The programs included with the Debian GNU/Linux system are free software;
the exact distribution terms for each program are described in the
individual files in /usr/share/doc/*/copyright.

Debian GNU/Linux comes with ABSOLUTELY NO WARRANTY, to the extent
permitted by applicable law.
root@jukebox-debian9:~# ip a
1: lo:  mtu 65536 qdisc noqueue state UNKNOWN group default qlen 1
    link/loopback 00:00:00:00:00:00 brd 00:00:00:00:00:00
    inet 127.0.0.1/8 scope host lo
       valid_lft forever preferred_lft forever
    inet6 ::1/128 scope host
       valid_lft forever preferred_lft forever
2: ens3:  mtu 1500 qdisc pfifo_fast state UP group default qlen 1000
    link/ether 52:54:00:4d:48:9a brd ff:ff:ff:ff:ff:ff
    inet 192.168.100.114/24 brd 192.168.100.255 scope global ens3
       valid_lft forever preferred_lft forever
    inet6 2409:10:ad40:xxxx:xxxx:xx:xxxx:489a/64 scope global mngtmpaddr dynamic
       valid_lft 8492sec preferred_lft 6692sec
    inet6 fe80::5054:ff:fe4d:489a/64 scope link
       valid_lft forever preferred_lft forever
3: ens4:  mtu 1500 qdisc noop state DOWN group default qlen 1000
    link/ether 52:54:00:46:de:c1 brd ff:ff:ff:ff:ff:ff
4: ens5:  mtu 1500 qdisc noop state DOWN group default qlen 1000
    link/ether 52:54:00:6f:91:13 brd ff:ff:ff:ff:ff:ff
root@jukebox-debian9:~#
ゲストOS側のコンソール出力設定
ゲストOSのコンソール出力をホストOS側のコンソールへ表示できないのは何かと不便なので、ゲストOSのコンソール出力を表示できるように設定を変更することにする.
ゲストOSにrootでログインし、次の設定を行えば次回のゲストOS起動時から、自動的にゲストOSのコンソール画面がホストOS側のコンソール上に表示されるようになるだろう.
# systemctl enable serial-getty@ttyS0.service
# systemctl start serial-getty@ttyS0.service
[root@jukebox ~]# ssh -l yasuaki 192.168.100.115
The authenticity of host '192.168.100.115 (192.168.100.115)' can't be established.
ECDSA key fingerprint is SHA256:k60MFda                  eX4liohTjUnY.
ECDSA key fingerprint is MD5:fc:7a:5a:4a:c6:3      4:fb:1c:56:e7:ae:09.
Are you sure you want to continue connecting (yes/no)? yes
Warning: Permanently added '192.168.100.115' (ECDSA) to the list of known hosts.
yasuaki@192.168.100.115's password:
Linux jukebox-debian9 4.9.0-7-amd64 #1 SMP Debian 4.9.110-3+deb9u2 (2018-08-13) x86_64

The programs included with the Debian GNU/Linux system are free software;
the exact distribution terms for each program are described in the
individual files in /usr/share/doc/*/copyright.

Debian GNU/Linux comes with ABSOLUTELY NO WARRANTY, to the extent
permitted by applicable law.
yasuaki@jukebox-debian9:~$ su -
Password:
root@jukebox-debian9:~# systemctl enable serial-getty@ttyS0.service  <=
Created symlink /etc/systemd/system/getty.target.wants/serial-getty@ttyS0.service → /lib/systemd/system/serial-getty@.service.
root@jukebox-debian9:~# systemctl start serial-getty@ttyS0.service  <=


 【reboot】


Loading Linux 4.9.0-7-amd64 ...
Loading initial ramdisk ...
[23836.383016] br0: port 2(vnet0) entered learning state
[23836.446980] br1: port 2(vnet1) entered learning state
[23836.479010] br2: port 2(vnet2) entered learning state

Debian GNU/Linux 9 jukebox-debian9 ttyS0

jukebox-debian9 login:
ゲストOS稼働時のホストOS側のネットワークインタフェース
ゲストOSが稼働している状態で、ホストOS側のネットワークインタフェースの状態を示すと次の様になっている.”vnet0″, “vnet1”, “vnet2” が動的に生成されていることが確認できる.
[root@jukebox ~]# ip addr
1: lo:  mtu 65536 qdisc noqueue state UNKNOWN group default qlen 1000
    link/loopback 00:00:00:00:00:00 brd 00:00:00:00:00:00
    inet 127.0.0.1/8 scope host lo
       valid_lft forever preferred_lft forever
2: eth0:  mtu 1500 qdisc mq master br0 state UP group default qlen 1000
    link/ether 00:0d:b9:47:1c:18 brd ff:ff:ff:ff:ff:ff
3: eth1:  mtu 1500 qdisc mq master br1 state UP group default qlen 1000
    link/ether 00:0d:b9:47:1c:19 brd ff:ff:ff:ff:ff:ff
4: eth2:  mtu 1500 qdisc mq master br2 state DOWN group default qlen 1000
    link/ether 00:0d:b9:47:1c:1a brd ff:ff:ff:ff:ff:ff
5: br2:  mtu 1500 qdisc noqueue state UP group default qlen 1000
    link/ether 00:0d:b9:47:1c:1a brd ff:ff:ff:ff:ff:ff
    inet 192.168.20.254/24 brd 192.168.20.255 scope global noprefixroute br2
       valid_lft forever preferred_lft forever
    inet6 fe80::5824:d884:6d15:cd19/64 scope link noprefixroute
       valid_lft forever preferred_lft forever
6: br1:  mtu 1500 qdisc noqueue state UP group default qlen 1000
    link/ether 00:0d:b9:47:1c:19 brd ff:ff:ff:ff:ff:ff
    inet 192.168.10.254/24 brd 192.168.10.255 scope global noprefixroute br1
       valid_lft forever preferred_lft forever
7: br0:  mtu 1500 qdisc noqueue state UP group default qlen 1000
    link/ether 00:0d:b9:47:1c:18 brd ff:ff:ff:ff:ff:ff
    inet 192.168.100.14/24 brd 192.168.100.255 scope global noprefixroute br0
       valid_lft forever preferred_lft forever
    inet 192.168.100.51/24 brd 192.168.100.255 scope global secondary noprefixroute br0
       valid_lft forever preferred_lft forever
52: vnet0:  mtu 1500 qdisc pfifo_fast master br0 state UNKNOWN group default qlen 1000
    link/ether fe:54:00:c8:eb:a2 brd ff:ff:ff:ff:ff:ff
53: vnet1:  mtu 1500 qdisc pfifo_fast master br1 state UNKNOWN group default qlen 1000
    link/ether fe:54:00:fe:cd:33 brd ff:ff:ff:ff:ff:ff
54: vnet2:  mtu 1500 qdisc pfifo_fast master br2 state UNKNOWN group default qlen 1000
    link/ether fe:54:00:83:36:5b brd ff:ff:ff:ff:ff:ff
[root@jukebox ~]#
“upmpdcli” のインストール
KVM環境の構築やゲストOSのインストールで大部時間を費やしてしまったが、いよいよ本題の “upmpdcli” のインストール作業に取り掛かることにしよう.インストール作業と言ってもCentOS7のときのような面倒な作業は必要なく、Debian Stretch(AMD64) 環境用のバイナリパッケージを導入するだけだ.
インストールの方法は、”Upmpdcli downloads” ページに詳しく書かれているので、”Debian” の “Non-ARM Debian Stretch” の設定内容を、”/etc/apt/sources.list.d/upmpdcli.list” に書き込めば良い.
インストール後の設定はCentOS7の場合と同じように、”/etc/upmpdcli.conf” を適切に設定するだけだ.Debian環境であれば何の苦労も無く “upmpdcli” を稼働させることができるのだ.APU2C4のOSはCentOSではなく最初からDebianにしておいた方が苦労なく進められたかもしれない...
root@jukebox-debian9:~#vi /etc/apt/sources.list.d/upmpdcli.list
...
root@jukebox-debian9:~# cat /etc/apt/sources.list.d/upmpdcli.list
deb http://www.lesbonscomptes.com/upmpdcli/downloads/debian/ stretch main
deb-src http://www.lesbonscomptes.com/upmpdcli/downloads/debian/ stretch main
root@jukebox-debian9:~# apt-get update
Ign:1 http://ftp.jp.debian.org/debian stretch InRelease
Hit:2 http://ftp.jp.debian.org/debian stretch-updates InRelease
Hit:3 http://security.debian.org/debian-security stretch/updates InRelease
Hit:4 http://ftp.jp.debian.org/debian stretch Release
Get:5 http://www.lesbonscomptes.com/upmpdcli/downloads/debian stretch InRelease [3,800 B]
Ign:5 http://www.lesbonscomptes.com/upmpdcli/downloads/debian stretch InRelease
Get:7 http://www.lesbonscomptes.com/upmpdcli/downloads/debian stretch/main Sources [2,915 B]
Get:8 http://www.lesbonscomptes.com/upmpdcli/downloads/debian stretch/main amd64 Packages [5,418 B]
Fetched 12.1 kB in 2s (4,667 B/s)
Reading package lists... Done
W: GPG error: http://www.lesbonscomptes.com/upmpdcli/downloads/debian stretch InRelease: The following signatures couldn't be verified because the public key is not available: NO_PUBKEY 7808CE96D38B9201
W: The repository 'http://www.lesbonscomptes.com/upmpdcli/downloads/debian stretch InRelease' is not signed.
N: Data from such a repository can't be authenticated and is therefore potentially dangerous to use.
N: See apt-secure(8) manpage for repository creation and user configuration details.
root@jukebox-debian9:~# apt-get install upmpdcli
Reading package lists... Done
Building dependency tree
Reading state information... Done
The following additional packages will be installed:
libjsoncpp1 libmicrohttpd12 libmpdclient2 libupnp6 libupnpp4
The following NEW packages will be installed:
libjsoncpp1 libmicrohttpd12 libmpdclient2 libupnp6 libupnpp4 upmpdcli
0 upgraded, 6 newly installed, 0 to remove and 1 not upgraded.
Need to get 955 kB of archives.
After this operation, 3,147 kB of additional disk space will be used.
Do you want to continue? [Y/n] y
WARNING: The following packages cannot be authenticated!
libupnp6 libupnpp4 upmpdcli
Install these packages without verification? [y/N] y
Get:1 http://ftp.jp.debian.org/debian stretch/main amd64 libmicrohttpd12 amd64 0.9.51-1 [73.9 kB]
Get:2 http://ftp.jp.debian.org/debian stretch/main amd64 libmpdclient2 amd64 2.9-1 [36.7 kB]
Get:3 http://ftp.jp.debian.org/debian stretch/main amd64 libjsoncpp1 amd64 1.7.4-3 [75.6 kB]
Get:4 http://www.lesbonscomptes.com/upmpdcli/downloads/debian stretch/main amd64 libupnp6 amd64 1:1.6.20.jfd5-1~ppa1~stretch [165 kB]
Get:5 http://www.lesbonscomptes.com/upmpdcli/downloads/debian stretch/main amd64 libupnpp4 amd64 0.16.0-1~ppa1~stretch [245 kB]
Get:6 http://www.lesbonscomptes.com/upmpdcli/downloads/debian stretch/main amd64 upmpdcli amd64 1.2.15-2~ppa1~stretch [358 kB]
Fetched 955 kB in 1s (513 kB/s)
Selecting previously unselected package libmicrohttpd12.
(Reading database ... 26853 files and directories currently installed.)
Preparing to unpack .../0-libmicrohttpd12_0.9.51-1_amd64.deb ...
Unpacking libmicrohttpd12 (0.9.51-1) ...
Selecting previously unselected package libmpdclient2.
Preparing to unpack .../1-libmpdclient2_2.9-1_amd64.deb ...
Unpacking libmpdclient2 (2.9-1) ...
Selecting previously unselected package libupnp6.
Preparing to unpack .../2-libupnp6_1%3a1.6.20.jfd5-1~ppa1~stretch_amd64.deb ...
Unpacking libupnp6 (1:1.6.20.jfd5-1~ppa1~stretch) ...
Selecting previously unselected package libjsoncpp1:amd64.
Preparing to unpack .../3-libjsoncpp1_1.7.4-3_amd64.deb ...
Unpacking libjsoncpp1:amd64 (1.7.4-3) ...
Selecting previously unselected package libupnpp4.
Preparing to unpack .../4-libupnpp4_0.16.0-1~ppa1~stretch_amd64.deb ...
Unpacking libupnpp4 (0.16.0-1~ppa1~stretch) ...
Selecting previously unselected package upmpdcli.
Preparing to unpack .../5-upmpdcli_1.2.15-2~ppa1~stretch_amd64.deb ...
Unpacking upmpdcli (1.2.15-2~ppa1~stretch) ...
Setting up libmpdclient2 (2.9-1) ...
Processing triggers for libc-bin (2.24-11+deb9u3) ...
Setting up libupnp6 (1:1.6.20.jfd5-1~ppa1~stretch) ...
Processing triggers for systemd (232-25+deb9u4) ...
Setting up libmicrohttpd12 (0.9.51-1) ...
Setting up libjsoncpp1:amd64 (1.7.4-3) ...
Setting up libupnpp4 (0.16.0-1~ppa1~stretch) ...
Setting up upmpdcli (1.2.15-2~ppa1~stretch) ...
Created symlink /etc/systemd/system/multi-user.target.wants/upmpdcli.service → /lib/systemd/system/upmpdcli.service.
Processing triggers for libc-bin (2.24-11+deb9u3) ...
Processing triggers for systemd (232-25+deb9u4) ...
root@jukebox-debian9:~#
root@jukebox-debian9:~# apt-get install sc2mpd
Reading package lists... Done
Building dependency tree
Reading state information... Done
The following additional packages will be installed:
libasound2 libasound2-data libsamplerate0
Suggested packages:
libasound2-plugins alsa-utils
The following NEW packages will be installed:
libasound2 libasound2-data libsamplerate0 sc2mpd
0 upgraded, 4 newly installed, 0 to remove and 1 not upgraded.
Need to get 2,219 kB of archives.
After this operation, 5,879 kB of additional disk space will be used.
Do you want to continue? [Y/n] y
WARNING: The following packages cannot be authenticated!
sc2mpd
Install these packages without verification? [y/N] y
Get:1 http://ftp.jp.debian.org/debian stretch/main amd64 libasound2-data all 1.1.3-5 [173 kB]
Get:2 http://ftp.jp.debian.org/debian stretch/main amd64 libasound2 amd64 1.1.3-5 [497 kB]
Get:3 http://ftp.jp.debian.org/debian stretch/main amd64 libsamplerate0 amd64 0.1.8-8+b2 [949 kB]
Get:4 http://www.lesbonscomptes.com/upmpdcli/downloads/debian stretch/main amd64 sc2mpd amd64 1.1.4-1~ppa1~stretch [601 kB]
Fetched 2,219 kB in 1s (1,401 kB/s)
Selecting previously unselected package libasound2-data.
(Reading database ... 26943 files and directories currently installed.)
Preparing to unpack .../libasound2-data_1.1.3-5_all.deb ...
Unpacking libasound2-data (1.1.3-5) ...
Selecting previously unselected package libasound2:amd64.
Preparing to unpack .../libasound2_1.1.3-5_amd64.deb ...
Unpacking libasound2:amd64 (1.1.3-5) ...
Selecting previously unselected package libsamplerate0:amd64.
Preparing to unpack .../libsamplerate0_0.1.8-8+b2_amd64.deb ...
Unpacking libsamplerate0:amd64 (0.1.8-8+b2) ...
Selecting previously unselected package sc2mpd.
Preparing to unpack .../sc2mpd_1.1.4-1~ppa1~stretch_amd64.deb ...
Unpacking sc2mpd (1.1.4-1~ppa1~stretch) ...
Setting up libasound2-data (1.1.3-5) ...
Setting up libasound2:amd64 (1.1.3-5) ...
Processing triggers for libc-bin (2.24-11+deb9u3) ...
Setting up libsamplerate0:amd64 (0.1.8-8+b2) ...
Setting up sc2mpd (1.1.4-1~ppa1~stretch) ...
Processing triggers for libc-bin (2.24-11+deb9u3) ...
root@jukebox-debian9:~#
root@jukebox-debian9:~# cat /etc/upmpdcli.conf
# The XML tags in the comments are used to help produce the documentation
# from the sample/reference file, and not at all at run time, where
# comments are just comments. Edit at will.
# The command line options have higher priorities than the values in
# this file.
# Upmpdcli general parameters
# "Friendly Name" for the
# UPnP Media Renderer. This will be displayed by most Control
# Points to identify the Renderer. Some OpenHome Control Points may display
# the 'ohproductroom' value instead.
#friendlyname = UpMpd
# Enable UPnP AV services
# (0/1). This is set by default, but it may useful to switch
# it off with some OpenHome Control Points which are too easily confused by
# the presence of UPnP AV services.
#upnpav = 1
# Enable OpenHome services
# (0/1). This defaults to 1, as OpenHome queuing is superior
# for most usages. There should be little reason to turn it
# off.
#openhome = 1
...
ゲストOS(Debian Stretch)のIPアドレス設定
Debian Stretchはインストール時点ではDHCPによる自動割り当て状態になっており、DHCPでの運用が前提であれば特に何も設定する必要は無い.以前、Debian StretchのRaspberry Pi ディストリビューションでの固定IPアドレス設定について簡単に紹介したが、御本家のDebian Stretchの実装では、従来のIPアドレス設定方法をそのまま踏襲しているようだ.詳しい内容は、御本家のマニュアル「Debian 管理者ハンドブック 8.2. ネットワークの設定」を参照すると良いだろう.
インストール後のネットワークの状態を確認すると、
root@jukebox-debian9:/etc/network# ip a
1: lo:  mtu 65536 qdisc noqueue state UNKNOWN group default qlen 1
    link/loopback 00:00:00:00:00:00 brd 00:00:00:00:00:00
    inet 127.0.0.1/8 scope host lo
       valid_lft forever preferred_lft forever
    inet6 ::1/128 scope host
       valid_lft forever preferred_lft forever
2: ens3:  mtu 1500 qdisc pfifo_fast state UP group default qlen 1000
    link/ether 52:54:00:c8:eb:a2 brd ff:ff:ff:ff:ff:ff
    inet 192.168.100.115/24 brd 192.168.100.255 scope global ens3
       valid_lft forever preferred_lft forever
    inet6 2409:10:ad40:xxxx:xxxx:xx:xxxx:eba2/64 scope global mngtmpaddr dynamic
       valid_lft 7618sec preferred_lft 5818sec
    inet6 fe80::5054:ff:fec8:eba2/64 scope link
       valid_lft forever preferred_lft forever
3: ens4:  mtu 1500 qdisc noop state DOWN group default qlen 1000
    link/ether 52:54:00:fe:cd:33 brd ff:ff:ff:ff:ff:ff
4: ens5:  mtu 1500 qdisc noop state DOWN group default qlen 1000
    link/ether 52:54:00:83:36:5b brd ff:ff:ff:ff:ff:ff
root@jukebox-debian9:/etc/network#
“/etc/network/interfaces” の設定例
# This file describes the network interfaces available on your system
# and how to activate them. For more information, see interfaces(5).

source /etc/network/interfaces.d/*

# The loopback network interface
auto lo
iface lo inet loopback

# The primary network interface
allow-hotplug ens3
#iface ens3 inet dhcp
iface ens3 inet static
  address  192.168.100.17
  netmask 255.255.255.0
  broadcast 192.168.100.255
  network   192.168.100.0
  gateway   192.168.100.254
# This is an autoconfigured IPv6 interface
iface ens3 inet6 auto

# The secondary netork interface
allow-hotplug ens4
#iface ens4 inet dhcp
iface ens4 inet static
  address  192.168.10.253
  netmask 255.255.255.0
  broadcast 192.168.10.255
  network   192.168.10.0
# This is an autoconfigured IPv6 interface
#iface ens4 inet6 auto

# The thirdly network interface
allow-hotplug ens5
#iface ens5 inet dhcp
iface ens5 inet static
  address  192.168.20.253
  netmask 255.255.255.0
  broadcast 192.168.20.255
  network   192.168.20.0
# This is an autoconfigured IPv6 interface
#iface ens5 inet6 auto
networkを再起動後に確認してみると、
root@jukebox-debian9:~# ip a
1: lo:  mtu 65536 qdisc noqueue state UNKNOWN group default qlen 1
    link/loopback 00:00:00:00:00:00 brd 00:00:00:00:00:00
    inet 127.0.0.1/8 scope host lo
       valid_lft forever preferred_lft forever
    inet6 ::1/128 scope host
       valid_lft forever preferred_lft forever
2: ens3:  mtu 1500 qdisc pfifo_fast state UP group default qlen 1000
    link/ether 52:54:00:c8:eb:a2 brd ff:ff:ff:ff:ff:ff
    inet 192.168.100.17/24 brd 192.168.100.255 scope global ens3
       valid_lft forever preferred_lft forever
    inet6 2409:10:ad40:xxxx:xxxx:xx:xxxx:eba2/64 scope global mngtmpaddr dynamic
       valid_lft 14125sec preferred_lft 12325sec
    inet6 fe80::5054:ff:fec8:eba2/64 scope link
       valid_lft forever preferred_lft forever
3: ens4:  mtu 1500 qdisc pfifo_fast state UP group default qlen 1000
    link/ether 52:54:00:fe:cd:33 brd ff:ff:ff:ff:ff:ff
    inet 192.168.10.253/24 brd 192.168.10.255 scope global ens4
       valid_lft forever preferred_lft forever
    inet6 fe80::5054:ff:fefe:cd33/64 scope link
       valid_lft forever preferred_lft forever
4: ens5:  mtu 1500 qdisc pfifo_fast state UP group default qlen 1000
    link/ether 52:54:00:83:36:5b brd ff:ff:ff:ff:ff:ff
    inet 192.168.20.253/24 brd 192.168.20.255 scope global ens5
       valid_lft forever preferred_lft forever
    inet6 fe80::5054:ff:fe83:365b/64 scope link
       valid_lft forever preferred_lft forever
root@jukebox-debian9:~#
Appendix: KVM環境の運用あれこれ
KVM環境による仮想サーバの運用はとても便利なのだが、KVM環境下での仮想サーバの運用は、通常のLinux運用とは別に、KVM環境に対する運用スキルが必要だ.ここでは、KVM環境下の仮想サーバを運用するための”virsh”コマンドを幾つか簡単に紹介する.
【仮想マシンの状態表示】
仮想マシンの一覧や状態を表示する.
・稼動中の仮想マシンの一覧表示
# virsh list
・全仮想マシンの一覧表示
# virsh list –all
[root@jukebox ~]#  virsh list
 Id    Name                           State
----------------------------------------------------
 15    debian9                        running

[root@jukebox ~]#  virsh list --all
 Id    Name                           State
----------------------------------------------------
 15    debian9                        running
 -     debian9-v                      shut off
【仮想マシンの起動】
仮想マシンを起動するには、ホストOS側で次の “virsh” コマンドを入力する.xxxxは作成した仮想マシンの名前
・仮想マシンの単純起動(コンソール画面出力なし)
# virsh start xxxxxx
・仮想マシンの起動(コンソール画面出力あり)
# virsh start xxxxxx –console
【仮想マシンの停止】
停止は通常 “shutdown” で行うが、上手く行かない場合は “destroy” で強制的に仮想サーバを停止する方法がある.但し、ゲスト仮想マシンのファイルシステムが破損する可能性があるので、virsh destroy コマンドは、ゲスト仮想マシンが反応しない場合のみに使用すること.
・仮想マシンの停止
# virsh shutdown xxxxxx
・仮想マシンの強制停止
# virsh destroy xxxxxx
[root@jukebox ~]# virsh list --all
 Id    Name                           State
----------------------------------------------------
 15    debian9                        running
 17    debian9-v                      running

[root@jukebox ~]# virsh shutdown debian9-v
Domain debian9-v is being shutdown

[root@jukebox ~]# virsh list --all
 Id    Name                           State
----------------------------------------------------
 15    debian9                        running
 -     debian9-v                      shut off
【仮想マシンの自動起動の設定】
仮想マシンを自動的に起動させる.
・仮想マシンの自動起動設定
# virsh autostart xxxxxx
・仮想マシンの自動起動設定解除
# virsh autostart –disable xxxxxx
[root@jukebox ~]#  virsh list --all
 Id    Name                           State
----------------------------------------------------
 15    debian9                        running
 18    debian9-v                      running

[root@jukebox ~]# virsh autostart debian9
Domain debian9 marked as autostarted

[root@jukebox ~]# virsh autostart debian9-v
Domain debian9-v marked as autostarted
【コンソール出力の制御】
ホストOS側のコンソール画面にゲストOS側のコンソール画面を表示させたり、元のホストOS側のコンソール画面に戻すためのコマンド.
・ホストOSからゲストOS側のコンソールへの切り替え
# virsh console xxxxxx
・ホストOS側へコンソールを戻す
Ctrl + ] (コントロールキーと”]”キーの同時押下)
【仮想マシンのACPI設定】
Debian Stretchのインストール時に ACPI 関係のモジュールが組み込まれていないと、”virsh shutdown” コマンドでシャットダウンができない場合がある.この場合はゲストOS側でACPIによる電源管理機能を有効にしておくことで、正常にゲストOSをシャットダウンできるようになる.
Debian Stretch でのACPI機能の追加
[root@jukebox ~]# virsh console debian9
Connected to domain debian9
Escape character is ^]

Debian GNU/Linux 9 jukebox-debian9 ttyS0

jukebox-debian9 login: root
Password:
Last login: Sat Sep  8 23:45:15 JST 2018 on ttyS0
Linux jukebox-debian9 4.9.0-7-amd64 #1 SMP Debian 4.9.110-3+deb9u2 (2018-08-13) x86_64

The programs included with the Debian GNU/Linux system are free software;
the exact distribution terms for each program are described in the
individual files in /usr/share/doc/*/copyright.

Debian GNU/Linux comes with ABSOLUTELY NO WARRANTY, to the extent
permitted by applicable law.
root@jukebox-debian9:~# apt-get  install acpi-support-base <== ACPIパッケージのインストール
Reading package lists... Done
Building dependency tree
Reading state information... Done
The following additional packages will be installed:
  acpid
Suggested packages:
  acpi-support consolekit
The following NEW packages will be installed:
  acpi-support-base acpid
0 upgraded, 2 newly installed, 0 to remove and 1 not upgraded.
Need to get 81.2 kB of archives.
After this operation, 190 kB of additional disk space will be used.
Do you want to continue? [Y/n] y
Get:1 http://ftp.jp.debian.org/debian stretch/main amd64 acpid amd64 1:2.0.28-1+b1 [57.2 kB]
Get:2 http://ftp.jp.debian.org/debian stretch/main amd64 acpi-support-base all 0.142-8 [24.0 kB]
Fetched 81.2 kB in 0s (204 kB/s)
Selecting previously unselected package acpid.
(Reading database ... 27138 files and directories currently installed.)
Preparing to unpack .../acpid_1%3a2.0.28-1+b1_amd64.deb ...
Unpacking acpid (1:2.0.28-1+b1) ...
Selecting previously unselected package acpi-support-base.
Preparing to unpack .../acpi-support-base_0.142-8_all.deb ...
Unpacking acpi-support-base (0.142-8) ...
Setting up acpid (1:2.0.28-1+b1) ...
Created symlink /etc/systemd/system/sockets.target.wants/acpid.socket → /lib/systemd/system/acpid.socket.
Created symlink /etc/systemd/system/paths.target.wants/acpid.path → /lib/systemd/system/acpid.path.
Processing triggers for systemd (232-25+deb9u4) ...
Processing triggers for man-db (2.7.6.1-2) ...
Setting up acpi-support-base (0.142-8) ...
root@jukebox-debian9:~#
【仮想マシンの削除】
仮想マシンを削除するには、ドメイン名(xxxxxx)の定義を解除した後、仮想マシンイメージファイルを削除する.オプションで関連するストレージボリュームを削除することもできる.詳細は、RedHatのKVM関連のマニュアル 「21.9. 仮想マシンの削除」を参照すると良いだろう.
・仮想マシンドメイン(xxxxxx) の定義削除
# virsh undefine xxxxxx
–remove-all-storage 関連付けられたすべてのストレージボリューム削除
ちなみに、不要となった仮想マシンを手順を踏んで手動で削除する場合は、次の手順で削除すると良いだろう.
1. autostart設定の解除
# virsh autostart –disable xxxxx
2. virshの管理対象から外す
# virsh undefine xxxxxx
3. 仮想サーバのイメージファイルが格納されているプールを確認
# virsh pool-list –all
4. プールに紐づくデバイスを確認
# virsh vol-list yyyyy
5. プール中の該当仮想イメージファイルを削除する
# virsh vol-delete –pool yyyyy xxxxx
 [root@jukebox network-scripts]# virsh list --all
 Id    Name                           State
----------------------------------------------------
 -     debian9                        shut off

[root@jukebox ~]# virsh undefine debian9
Domain debian9 has been undefined

[root@jukebox ~]# virsh pool-list --all
 Name                 State      Autostart
-------------------------------------------
 images               active     yes

[root@jukebox ~]# virsh vol-list images
 Name                 Path
------------------------------------------------------------------------------
 debian9-b751.img     /var/lib/libvirt/images/debian9-b751.img

[root@jukebox ~]# virsh vol-delete --pool images debian9-b751.img
Vol debian9-b751.img deleted

[root@jukebox network-scripts]# virsh vol-list images
 Name                 Path
------------------------------------------------------------------------------

[root@jukebox ~]#
Appendix: APU2C4に物理シャットダウンスイッチをつなぐ
APU2C4のマザーボードの J2コネクタの Pin:2-3 は “power button” となっており、このピンを電気的にショートさせると、ACPU2C4を強制的にシャットダウンさせることができる.ホストOS側のCentOS7でACPIが有効に設定されていれば、CentOS7が自動的にシャットダウンして、電源断状態になる.
電源断状態で、再びこの”power button” をショートさせると、電源 “ON” 状態になり、CentOS7 が自動起動するので、J2 端子のPin:2-3を外部のコンタクトSWに接続しておくと、APU2C4の運用がとても楽になるので、是非ともこの外部電源制御SW機能を実装しておいて欲しい.
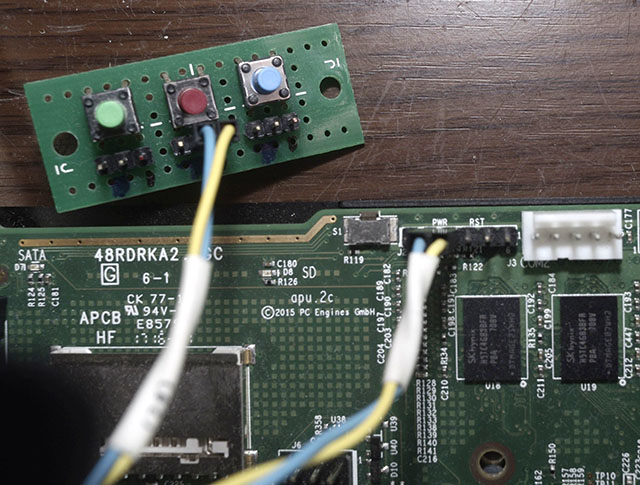
APU2C4のJ2コネクタのPin:2-3間に外部コンタクトSWを接続する
この”power button” 機能と小型のUPSを組み合わせると、突然の電源断にも対処可能な完全版の家庭用ミュージックサーバの完成形が出来上がるだろう.現在、APU2C4用の小型UPS装置の自作に取り組んでいるので、近いうちに紹介できることだろう.
CentOS Linux 7 (Core)
Kernel 3.10.0-862.11.6.el7.x86_64 on an x86_64

jukebox login:   <=== この状態で "power button" SW を押下

[  OK  ] Started Show Plymouth Power Off Screen.
[  OK  ] Stopped Dynamic System Tuning Daemon.
[  OK  ] Removed slice User Slice of yasuaki.
         Stopping Permit User Sessions...
         Stopping Login Service...
[  OK  ] Stopped Permit User Sessions.
[  OK  ] Stopped target Remote File Systems.
[  OK  ] Stopped target Remote File Systems (Pre).
         Stopping Logout off all iSCSI sessions on shutdown...
[  OK  ] Stopped target NFS client services.
         Stopping GSSAPI Proxy Daemon...
[  OK  ] Stopped GSSAPI Proxy Daemon.
[  OK  ] Stopped Login Service.
[  OK  ] Stopped Logout off all iSCSI sessions on shutdown.
[  OK  ] Stopped target Network.
         Stopping LSB: Bring up/down networking...
[ 2783.164838] IPv6: ADDRCONF(NETDEV_CHANGE): br0: link becomes ready
[ 2783.184199] device eth0 left promiscuous mode
[ 2783.189272] br0: port 1(eth0) entered disabled state
[ 2783.294552] IPv6: ADDRCONF(NETDEV_CHANGE): eth0: link becomes ready
[  OK  ] Started Restore /run/initramfs.
[ 2783.884906] IPv6: ADDRCONF(NETDEV_CHANGE): br1: link becomes ready
[ 2783.892516] device eth1 left promiscuous mode
[ 2783.897478] br1: port 1(eth1) entered disabled state
[ 2783.969756] IPv6: ADDRCONF(NETDEV_CHANGE): eth1: link becomes ready
[ 2784.511780] IPv6: ADDRCONF(NETDEV_UP): br2: link is not ready
[ 2784.518353] device eth2 left promiscuous mode
[ 2784.523079] br2: port 1(eth2) entered disabled state
[ 2784.601613] IPv6: ADDRCONF(NETDEV_UP): eth2: link is not ready
[ 2786.139674] IPv6: ADDRCONF(NETDEV_CHANGE): lo: link becomes ready
[  OK  ] Stopped LSB: Bring up/down networking.
         Stopping Network Manager...
[  OK  ] Stopped Network Manager.
[  OK  ] Stopped target Network (Pre).
         Stopping firewalld - dynamic firewall daemon...
[  OK  ] Stopped Rollback uncommitted netcf network config change transactions.
         Stopping Rollback uncommitted netcf...rk config change transactions...
[ 2788.144376] Ebtables v2.0 unregistered
[  OK  ] Stopped firewalld - dynamic firewall daemon.
         Stopping D-Bus System Message Bus...
         Stopping Authorization Manager...
[  OK  ] Stopped D-Bus System Message Bus.
[  OK  ] Stopped Authorization Manager.
[  OK  ] Stopped target Basic System.
[  OK  ] Stopped target Slices.
[  OK  ] Removed slice Virtual Machine and Container Slice.
[  OK  ] Removed slice User and Session Slice.
[  OK  ] Stopped target Sockets.
[  OK  ] Closed Virtual machine lock manager socket.
[  OK  ] Closed Open-iSCSI iscsid Socket.
[  OK  ] Closed Virtual machine log manager socket.
[  OK  ] Closed Open-iSCSI iscsiuio Socket.
[  OK  ype=1305 audit(1536460180.285:427): audit_pid=0 old=661 auid=4294967295 ses=4294967295 res=1
m] Closed Avahi [ 2788.650072] type=1131 audit(1536460180.297:428): pid=1 uid=0 auid=4294967295 ses=4294967295 msg='unit=auditd
comm="systemd" exe="/usr/lib/systemd/systemd" hostname=? addr=? terminal=? res=success'
mDNS/DNS-SD Stack Activation Socket.
[  O[ 2788.672463] type=1131 audit(1536460180.320:429): pid=1 uid=0 auid=4294967295 ses=4294967295 msg='unit=systemd-tmpfiles-setup comm="systemd" exe="/usr/lib/systemd/systemd" hostname=? addr=? terminal=? res=success'
K  ] Closed RPCbind Server A[ 2788.694743] type=1131 audit(1536460180.342:430): pid=1 uid=0 auid=4294967295 ses=4294967295 msg='unit=rhel-import-state comm="systemd" exe="/usr/lib/systemd/systemd" hostname=? addr=? terminal=? res=success'
ctivation Socket.
[  OK  ] Stopped target Paths.
  ...

[  OK  ] Stop[ 2789.083831] systemd-shutdown[1]: Sending SIGKILL to remaining processes...
ped Collect Read-Ahead Data.
         Stopping Collect Read-Ahead Data...
[  OK  ] Reached target Shutdown.
[ 2789.118027] systemd-shutdown[1]: Unmounting file systems.
[ 2789.124463] systemd-shutdown[1]: Remounting '/' read-only with options 'attr2,inode64,noquota'.
[ 2789.196623] systemd-shutdown[1]: Remounting '/' read-only with options 'attr2,inode64,noquota'.
[ 2789.205654] systemd-shutdown[1]: All filesystems unmounted.
[ 2789.211439] systemd-shutdown[1]: Deactivating swaps.
[ 2789.216897] systemd-shutdown[1]: All swaps deactivated.
[ 2789.222295] systemd-shutdown[1]: Detaching loop devices.
[ 2789.228525] systemd-shutdown[1]: All loop devices detached.
[ 2789.234270] systemd-shutdown[1]: Detaching DM devices.
[ 2789.240479] systemd-shutdown[1]: Detaching DM 253:2.
[ 2789.258436] systemd-shutdown[1]: Detaching DM 253:1.
[ 2789.274346] systemd-shutdown[1]: Not all DM devices detached, 1 left.
[ 2789.281166] systemd-shutdown[1]: Detaching DM devices.
[ 2789.287087] systemd-shutdown[1]: Not all DM devices detached, 1 left.
[ 2789.293731] systemd-shutdown[1]: Cannot finalize remaining DM devices, continuing.
[ 2789.322189] systemd-shutdown[1]: Successfully changed into root pivot.
[ 2789.329053] systemd-shutdown[1]: Returning to initrd...
[ 2789.515494] dracut Warning: Killing all remaining processes
dracut Warning: Killing all remaining processes
[ 2789.990188] XFS (dm-0): Unmounting Filesystem
[ 2790.010173] dracut Warning: Unmounted /oldroot.
[ 2790.116964] dracut: Disassembling device-mapper devices
Powering off.
[ 2790.165005] kvm: exiting hardware virtualization
[ 2790.171446] sd 0:0:0:0: [sda] Synchronizing SCSI cache
[ 2790.178740] sd 0:0:0:0: [sda] Stopping disk
[ 2790.415355] pcieport 0000:00:02.4: System wakeup enabled by ACPI
[ 2790.464231] pcieport 0000:00:02.3: System wakeup enabled by ACPI
[ 2790.513159] pcieport 0000:00:02.2: System wakeup enabled by ACPI
[ 2790.540908] ACPI: Preparing to enter system sleep state S5
[ 2790.547208] Power down
最後に
今回はAPU2C4にCentOS7を載せ、オールインワンタイプのミュージックサーバ兼オーディオ専用ルータ機能を実装してみたが如何だっただろうか.恐らく殆どの人は余りにも難しくて途中で諦めたのではないだろうか.
今回の記事内容は単にPC関係に詳しいだけでは無理で、ネットワークやLinuxサーバを相当熟知していなければ太刀打ちできないだろう.一応一通り手順は示してはいるが、Linuxなどの基本的な知識を持っている事を前提に説明しているので、一般のオーディオマニアレベルでは、この手順通りに設定することも難しいことと思う.
残念ながら現状では一般のユーザがハイエンドネットワークオーディオの世界に足を踏み入れるのは相当な苦難を強いられるだろう.何百万円もする超高級機材を導入したところで、ネットワーク環境を工夫しなければ「画竜点睛を欠く」と言えるだろう.
お金なんか無くても工夫次第でハイエンドネットワークオーディオの世界を楽しむことはできるということで...
